
Learn how to make frozen yogurt bites—an easy, healthy snack made with yogurt, fresh fruit, and optional toppings. These no-bake, bite-sized treats are perfect for kids or hot days when you want something cool and nutritious.
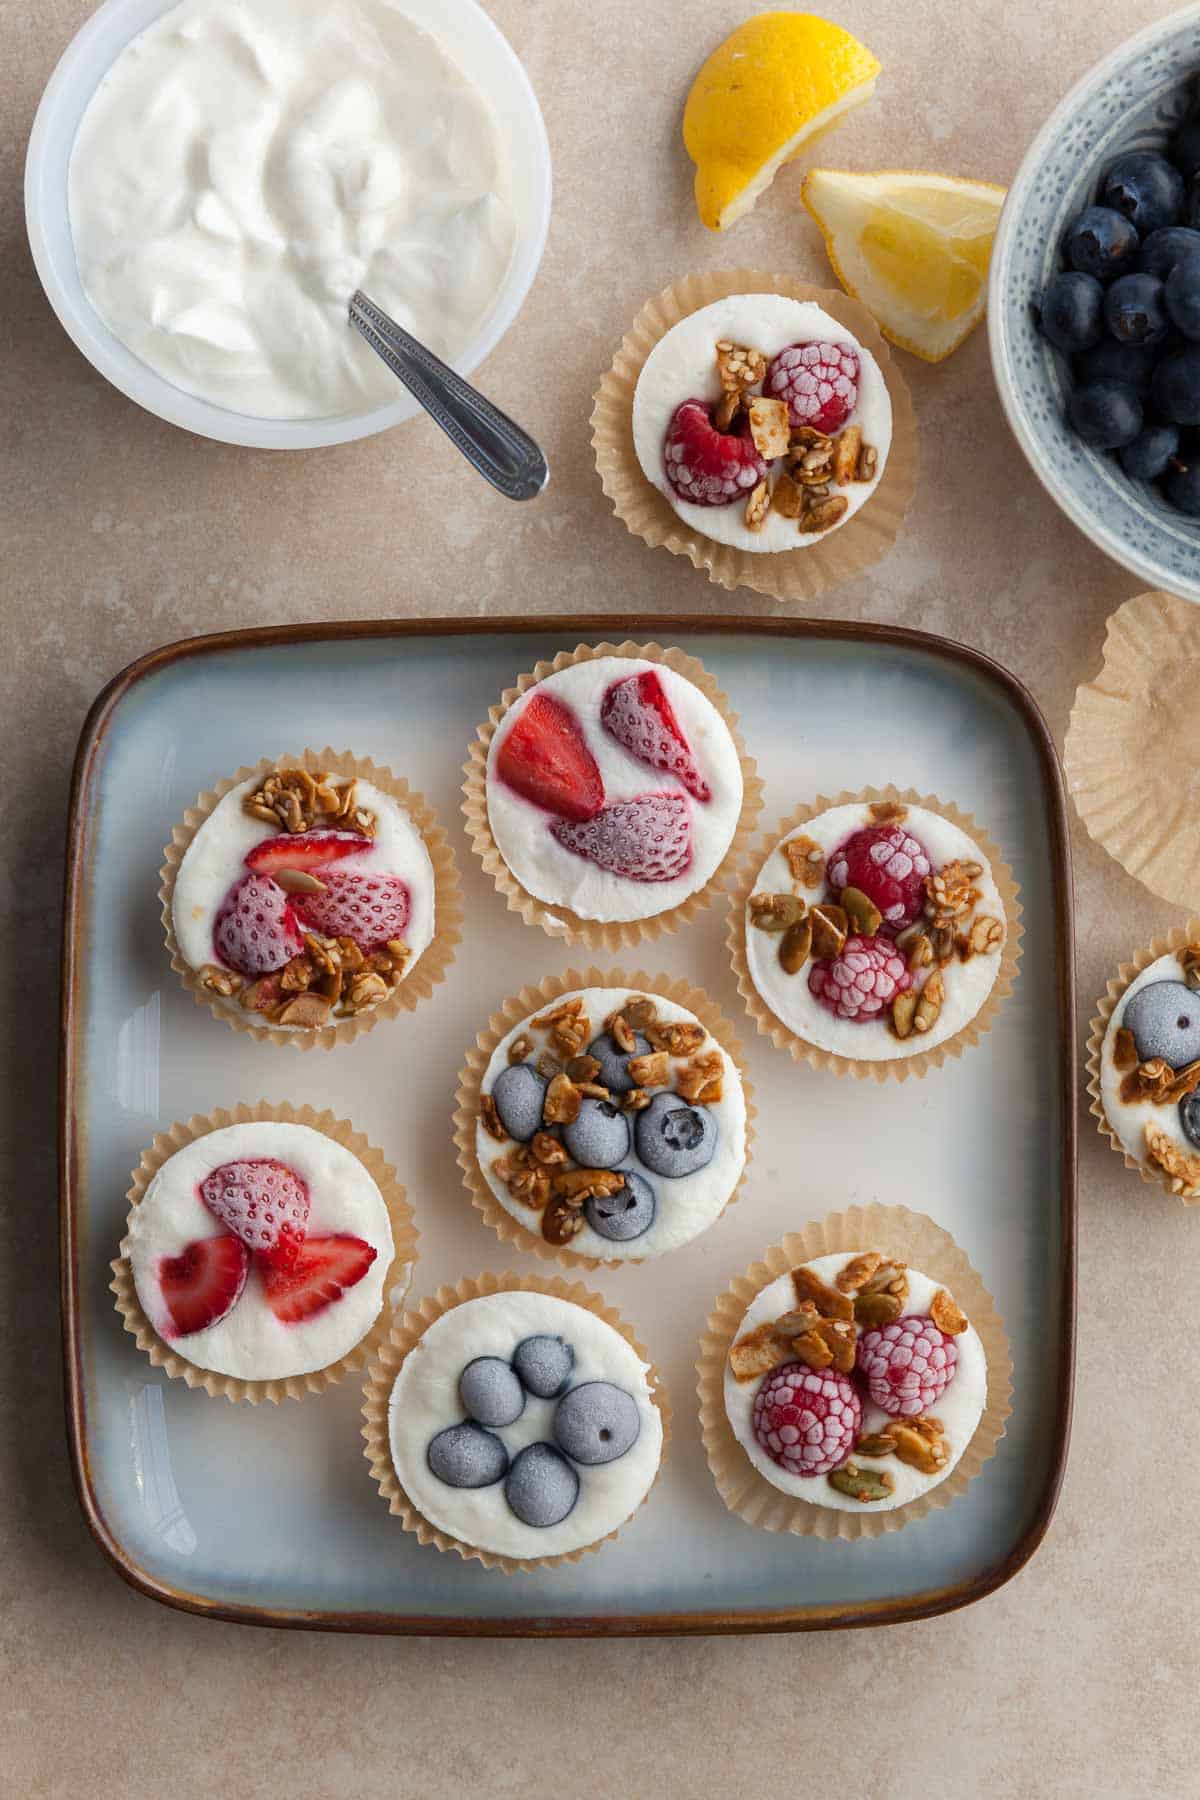
Frozen Yogurt Bites with Fruit
Looking for a healthy snack that’s easy to make and both kids and adults will love? Frozen yogurt bites are the perfect solution. These bite-sized treats are creamy, fruity, and fun to eat, making them ideal as a snack, an afterschool treat, or an after-dinner bite.
Best of all, they’re simple to make with just a few wholesome ingredients and you don’t need any special equipment. Whether you’re trying to eat healthier, cool down on a hot day, or find a new snack idea for your family, frozen yogurt bites are a tasty and nutritious option you’ll want to keep stocked in your freezer.
What Are Frozen Yogurt Bites?
Frozen yogurt bites are small, frozen treats made by combining sweetened yogurt with fruit (or other add-ins), then freezing the mixture in small portions.
You can make them in mini cupcake cups or ice cube molds and freeze them into bite-sized pieces. Perfect for a healthy snack, hot afternoons, or any time you’re craving a sweet treat.

Why You’ll Love Making Frozen Yogurt Bites
There are lots of reasons to try these healthy frozen yogurt snacks:
- Healthy and nutritious – Full of yogurt and real fruit.
- Kid-friendly – A fun, frozen treat that little ones love to make and eat.
- Customizable – Mix and match flavors, fruits, and textures.
- Make-ahead convenience – Keep a stash in the freezer for quick snacking.
- Low sugar option – Sweeten naturally with the sweetener of your choice.
- Dairy-Free Option – Swap regular yogurt for dairy-free yogurt for a non-dairy, vegan option.
🧊 Frozen Yogurt Bites vs. Frozen Yogurt Bark: What’s the Difference?
You’ve probably seen frozen yogurt bark trending on social media—a flat sheet of yogurt layered with fruit and toppings, then broken into pieces after freezing. So how do frozen yogurt bites compare?
Size & Portion Control
- Frozen Yogurt Bites: Pre-portioned into single servings. Great for snacking and little hands.
- Yogurt Bark: Made in a large slab and broken into uneven pieces. Fun and casual, but less tidy and harder to portion precisely.
Texture & Appearance
- Bites: Neat, molded shapes (especially when made in silicone molds), with layers or toppings that hold their shape.
- Bark: Rustic, “shattered” look. Great for visual appeal, but can melt faster and get messy when eating.
Customization
- Bites: Easy to make multiple flavor combos in one batch by using a mold tray—each bite can be a different flavor!
- Bark: Better for large, single-flavor batches. You can swirl or layer toppings, but it’s trickier to isolate flavors.
Storage & Convenience
- Frozen Yogurt Bites: Stackable, easy to store in containers or bags. Grab-and-go friendly.
- Frozen Yogurt Bark: Takes up more freezer space and can stick together in storage bags.
🥄 Bottom Line: Both frozen yogurt bites and bark are healthy, customizable frozen treats—but if you want portion control and less mess, yogurt bites are the win.
Ingredients for Frozen Yogurt Bites
Here’s what you’ll need to make a basic batch of frozen yogurt bites:
- Yogurt – Use a thick full-fat yogurt for the creamiest texture. You can substitute low-fat yogurt, but it may result in slightly icier bites.
- Dairy-free option: Use coconut milk yogurt, almond milk yogurt, or other non-dairy yogurt. Look for full-fat, unsweetened varieties for the best results. Note that some non-dairy yogurts freeze softer or icier depending on the base.
- Fresh or Frozen Fruit - Berries (strawberries, blueberries, raspberries) work best, but frozen fruit can also be used.
- Honey or Maple Syrup - Adds a touch of natural sweetness. (Skip if you’re using flavored yogurt.)
- Toppings (Optional) - For a fun finish sprinkle, chopped nuts, coconut, mini chocolate chips or granola on top before freezing.
- Silicone Mold or Mini Muffin Tin - Use a flexible mold to easily pop out the bites once frozen or line a mini-muffin tin with paper liners for easy removal.

How to Make Frozen Yogurt Bites: Step-by-Step Instructions
Step 1: Prepare Your Ingredients
- Wash and dry your fruit to prevent ice crystals.
Step 2: Mix Yogurt and Sweetener
- In a bowl, mix your yogurt with honey or maple syrup (or your sweetener of choice).
Step 3: Assemble the Bites
- Spoon a small amount of yogurt into each mold.
- Add a few pieces of fruit and gently press in.
- Sprinkle with toppings if desired.
Step 4: Freeze
- Place the tray in the freezer for at least 2–4 hours, or until fully solid.
Step 5: Store and Enjoy
- Once frozen, pop out the bites and transfer them to a freezer-safe container.
- Store for up to 1 month—though they’ll probably disappear much faster!
Tips for Success When Making Frozen Yogurt Bites
Want to make sure your frozen yogurt bites turn out perfectly every time? Here are some helpful tips and tricks to get the best texture, flavor, and appearance:
1. Use Full-Fat Yogurt for Creaminess - Full-fat yogurt creates the richest, creamiest texture and holds up better in the freezer. Low-fat or fat-free yogurt tends to get icier. If you’re going dairy-free, opt for thicker, creamier non-dairy yogurts like coconut yogurt. Thinner varieties may get icy when frozen.
2. Pat Fruit Dry - When using fresh fruit, make sure it’s dry before assembling. Too much moisture can lead to ice crystals in your bites.
3. Taste Before You Freeze - Once you mix your yogurt and sweetener, give it a quick taste test. Adjust the sweetness level before freezing.
4. Use Silicone Molds for Easy Removal - Silicone ice cube trays, lined mini muffin molds, or candy molds make removing frozen bites a breeze.
5. Freeze Long Enough - Let your bites freeze for at least 2–4 hours or overnight for best results. If they're not fully frozen, they may stick or fall apart when you try to remove them.
6. Store Properly to Prevent Freezer Burn - After freezing, transfer your yogurt bites to a sealed, freezer-safe container. This keeps them fresh and prevents freezer odors from seeping in.
7. Enjoy Straight from the Freezer - These bites melt quickly, especially in warm weather, so serve and eat them quickly for the best texture and flavor. Let the frozen yogurt bites stand at room temperature to soften for only a few minutes before enjoying.
Frozen Yogurt Bite Variations to Try
Get creative with your combinations! Here are a few ideas to inspire your next batch:
- Tropical Delight: Yogurt + pineapple + mango + shredded coconut topping
- Berry Parfait: Yogurt + Mixed berries + granola topping
- Nutbutter Bites: Yogurt + swirl of your favorite nut butter + mini chocolate chip topping
- Jam Swirl: Gently swirl a spoonful of your favorite fruit jam (like strawberry, raspberry, or apricot) into the yogurt before filling the molds for a sweet, fruity ribbon throughout each bite.
- Protein Boost: Stir a few tablespoons of your favorite protein powder (vanilla or unflavored works best) into the yogurt mixture before assembling.
Final Thoughts
Whether you’re looking for a healthy frozen snack or a fun treat for kids, frozen yogurt bites are a winning choice. They’re simple to make, easy to customize, and an all-around healthy frozen treat everyone will love.
So grab your favorite yogurt, add some fruit, and whip up a batch of these delicious frozen yogurt bites. Your future self will thank you!
For more creamy and refreshing ideas, explore these healthy frozen desserts, including fruit-based desserts, and easy no-bake summer recipes.
More Healthy Frozen Snacks:

Frozen Yogurt Bites
Learn how to make frozen yogurt bites with this easy, healthy, and delicious recipe! Perfect for a quick snack or a kid-friendly treat, these no-bake bites are customizable and freezer-friendly
Ingredients
- 2 cups/453g thick full-fat yogurt (or dairy-free yogurt, such as coconut yogurt)
- ¼ cup/60ml honey or maple syrup (adjust to taste)
- 2 teaspoons/10ml fresh lemon juice
- 1 teaspoon fresh lemon zest
- Fresh fruit (like berries, cherries etc.)
- Toppings such as granola, unsweetened shredded coconut, mini chocolate chips or crushed nuts (optional)
Instructions
- Prepare Fruit: Wash and dry fresh fruit.
- Mix Yogurt: In a medium bowl, stir together the yogurt, honey or maple syrup, lemon juice and lemon zest until smooth.
- Fill Molds: Spoon yogurt mixture into each cavity of a silicone mold or mini muffin tin about ¾ of the way to the top to allow room for the fruit.
- Add Fruit & Toppings: Top each yogurt portion with a few pieces of fruit and a sprinkle of toppings, gently pressing them into the yogurt.
- Freeze: Place the mold on a flat tray and freeze for at least 2–4 hours, or until solid.
- Store: Pop out the frozen yogurt bites and transfer them to a freezer-safe container. Store for up to 1 month.
- Enjoy!
Notes
Variations:
- Tropical Delight: Yogurt + pineapple + mango + shredded coconut topping
- Berry Parfait: Yogurt + Mixed berries + granola topping
- Nut Butter Bites: Yogurt + swirl of your favorite nut butter + mini chocolate chip topping
- Jam Swirl: Gently swirl a spoonful of your favorite fruit jam (like strawberry, raspberry, or apricot) into the yogurt before filling the molds for a sweet, fruity ribbon throughout each bite.
- Protein Boost: Stir 1–2 tablespoons of your favorite protein powder (vanilla or unflavored works best) into the yogurt mixture before assembling.
Storage:
Transfer bites to a freezer-safe container. Store for up to 1 month.
Dietary Info:
Gluten-Free, Grain-Free, Vegetarian, Vegan option, Dairy-Free option, Egg-Free, Nut-Free, Refined Sugar-Free
Nutrition Information:
Yield:
24Serving Size:
1Amount Per Serving: Calories: 89Total Fat: 5gSaturated Fat: 2gTrans Fat: 0gUnsaturated Fat: 2gCholesterol: 2mgSodium: 14mgCarbohydrates: 12gFiber: 1gSugar: 10gProtein: 2g
Nutritional information for recipes contained on this website, such as calories, fat, carbs, etc. are only estimates and are not guaranteed to be accurate.

Sylvie Shirazi is the recipe developer and food photographer behind Gourmande in the Kitchen. For the last 10 years she's been making eating more healthfully easy and accessible with gluten-free, grain-free, paleo and vegan recipes that are free from processed ingredients.

Leave a Reply