
 Part one and part two of the series discuss how to see more creatively by using the elements and principles of design. In part three professional prop stylist Paula Walters shares her tips on how to choose the right props for your images. For part four, food stylist Tami Hardeman answered your questions on food styling.
Today for part five of the series, food and still life photographer Ilva Beretta is here talking about creating moods in food photography.
Swedish by birth but now living in Italy with her husband and their three kids, Ilva started her blog, Lucillan Delights , over 5 years ago which led to her new career as a food photographer and recipe developer. You can find her professional work at Ilva Beretta Photography. You can also follow her on Facebook and Twitter. Welcome Ilva!
When I start working on a new food image, one of the first things I think about is which mood I want to convey; or, when working with editors or creative directors, the mood they want me to create.
Depending on whether the photos are intended for magazine/editorial use or commercial use, there are many aspects that you have to take into consideration when you are creating a mood.
I will show you five different examples of food images I have shot recently to show you how I (or in some cases we) went about getting the image I was looking for.
1. Rustic Mood

Photo info: Canon 5D mark II, lens: 50mm, f/4,5 , iso 200
This shot of fresh peas is a proposal for a book cover for a book on local produce I was asked to do.
I had just bought a bag of fresh peas and I knew that they wanted a rustic feel to it with warm tones so I pulled out a dark brown wooden board to have as a background and placed it on a old table I have in my studio.
Then I looked at my props and found this old box I bought in a thrift shop for a few euros. It is a very simple shot but I had to think about a few things to get it right:
- First I had to consider the mood of the image, not too much light so I just used the light from a window on the right hand without using any reflectors because I wanted the peas and the pods to stand out from the dark brown.
- I also underexposed the photo slightly to deepen the shadows.
- I put the focus on the pea and with an aperture of f/4.5 the background is out of focus but most of the peapods are still quite focused.
The composition of the image was very important as I had to leave empty spaces in the right places where the title and texts had to go in which meant I had to shoot it several times and compare with the photo of a previous book cover they had sent me before I got it right. But in the end I got a shot with a mood and a composition that satisfied me.
2. Bright Mood

Photo info: Canon 5D mark II, lens: 50mm, f/2,5 , iso 200
One of my regular jobs is shooting promotion photos with a big advertising agency for a chain of cafeterias here in Italy and this is a shot for one of them.
The client wanted clean, light images that emphasized the product and also conveyed a sense of hygiene so the mood of these images is constant and they are always shot on a white background with mostly white props with lots of light from several angles.
We always put the product in question in the forefront with props that relate to it in the background. The focus is on the product while the props in the background are kept well out of focus as they are only a means to creating a mood.
When I shoot these types of photos I usually overexpose the images a bit to get that bright feeling they are looking for.
I also have to consider the composition because there is a fixed layout with text in determined spaces.
Because I shoot this with the ad agency, I discuss any ideas with the creative director who usually is present at the shooting and then we adjust to make a good photo that the client is satisfied with.
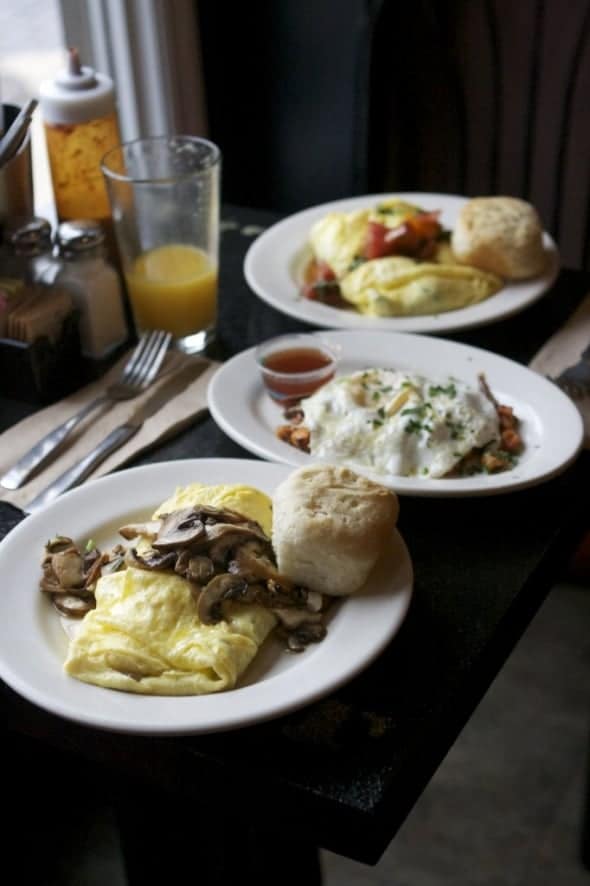
3. Casual Mood

Photo info: Canon 5D mark II, lens: macro 100mm, f/3,5 , iso 200
This is a photo that is part of recipe feature on cold summer soups that I recently did for a big Italian food magazine.
The editor wanted a summery feel to the pictures and possible shot outdoors so I propped up a table in the shadow under our oak where the table was spotted by sun glimpses. The focus is on the plate of soup in the foreground.
I wanted to create a feeling of a relaxing lunch in the garden with lots of sunlight but not directly on the food as it is a bit too harsh at that hour of the day.
Shooting outdoors with sunshine is not easy because even though it really helps to create a mood, you need to be careful about strong contrasts. I would suggest shooting either early in the morning or in late afternoon/evening when the rays are less strong and more slanted which helps to highlight the texture of the food and there are generally less strong contrasts between light and shadow.
4. Mood Based on Quality of Light

Obviously when I take photos for myself and for my blog Lucullian I am free as a bird to create the mood I want. One of the best aspects of that is that I can live in the present and create moods that are directly related to the season at hand.
Working for food magazines means that you are usually living three months ahead due to the time needed to plan and create the issues ahead of time.
The photos above were shot in late winter/early spring when the light has a cold quality to it, so I wanted to create an airy mood with lots of light.
I used daylight from a window on the left that was reflected by a silver reflector on the right hand side. I used a wooden board painted in palest blue on a green base and then scraped it to give it a stressed look. The white gauze fabric and white props also add to the lightness of the image.
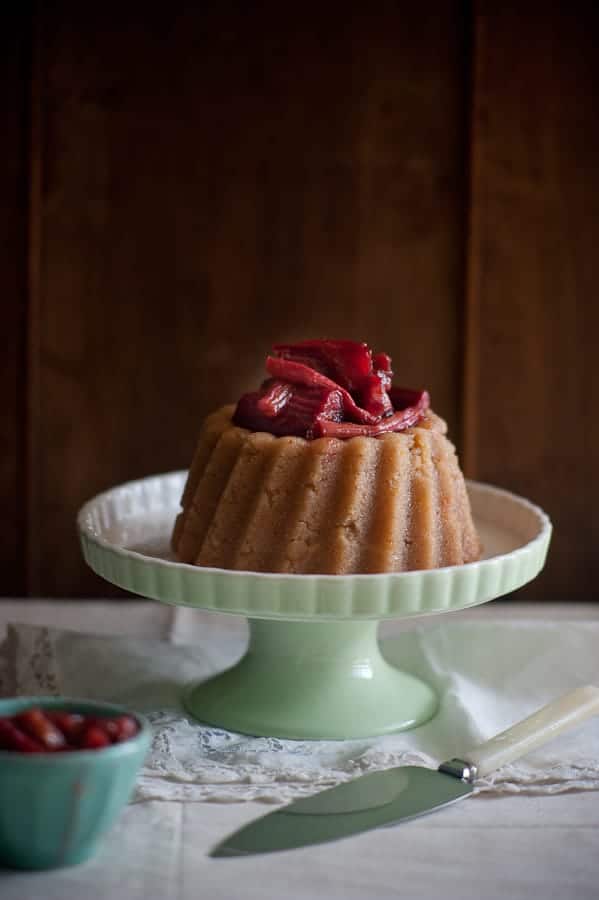
5. Mood Based on Place

Photo info: Canon 5D mark II, lens: 24-105mm, f/5, iso 200
During the spring and the summer (and the autumn too in Italy) I usually shoot a lot of photos outdoors in my garden.
I rig up provisional tables with various wooden boards on sawhorses in different places, which means I can create different moods quite easily.
I shot the above photo outdoors. I usually shoot a series of six or seven photos for a food magazine that asks me to use the same mood and settings in all the photos, and I decided to go for a series with a kitchen “feel” to it.
I used props that recall a kitchen and an even light all over because kitchens are usually very well lit spaces. The focus is on the slice of cake and at f/5 the cake is still in focus as it is the protagonist of the shot.
Here are a few pointers to use when you are creating moods:
1. First, think about what kind mood you want to create: is it a seasonal mood or more of a place? A party feeling or a more intimate mood? Or, do you want to concentrate on an ingredient that inspires you?
2. Whatever mood you decide on your next step is to start thinking about how to achieve it. Think of how you want the light to fall and how much of it you want. Choose backgrounds and props that suit that mood. If you want a darker mood,think darker plates and fabrics, wood is also a great help for creating atmospheres. Try using only one light source or if you use more than one, dim them down. If you are going for a lighter mood, use lighter background and props and light from more than one side. Use reflectors and/or white boards for fill light to get that lightness of mood you are looking for.
3. When you are actually shooting the photo, play around with the camera a bit. For a dark mood for example, under-expose your image to see if that gets you what you are looking for. Also think about where you want to put the focus and how much of the photo you want to be in focus, along with how the focus may influence the mood of the image.
4. Don’t forget to play around in the post production phase as well.
5. But above all, have fun and try to find your own voice and not to imitate what you see. Yes, get inspired but make it your way because the web is filled with imitations and I am sure you want your photos to stand out and show who you are and not how the most popular food bloggers do it.
Thank you Ilva for giving us a look into how you achieve the right mood for your images. For more beautiful food photography and recipes please visit Ilva’s food blog: Lucullian Delights.
(Writing and photography submitted for this post by Ilva Beretta, all rights reserved 2011.)
Read Part 1 of The Language of Food Photography | Learning the Visual Elements of Design.
Read Part 2 of the Language of Food Photography | The Principles of Design.
Read Part 3 of the Language of Food Photography | Prop Styling with Paula Walters.
Read Part 4 of the Language of Food Photography | Food Styling with Tami Hardeman.
How do you choose a mood for your images?

Sylvie Shirazi is the recipe developer and food photographer behind Gourmande in the Kitchen. For the last 10 years she's been making eating more healthfully easy and accessible with gluten-free, grain-free, paleo and vegan recipes that are free from processed ingredients.
Scott Lamoreaux says
Awesome website and tips. I plan on using them in my next food shoot. Keep it up.
Anamika says
This is such a wonderful post, with the tips that one only wishes that a pro can share..thanks so much for bringing the best food photographer/blogger to show it how!!
Cristina from TeenieCakes says
I so enjoyed how Ilva shared these different moods with examples and explanations of the shot. It's an educated, experienced and creative thought process that goes into such beautiful work. Thank you for sharing your insights...my mind is racing and I can't wait to shoot!
Magic of Spice says
Hi Ilva, what a beautiful and informative post! I will want to practice all of your fantastic tips 🙂
Shilpa says
What an informative post...Thank you so much Ilva..I have so much to learn...I have printed your wonderful tips and pointers for my photogrpahy folder...Absolutely amazing...Thank you ever so much
-Shilpa
ilva says
Thank you all for your heart warming comments, you really inspire me to go on shooting! xo