
Today please welcome Peter Georgakopoulos, the author behind Souvlaki for the Soul, professional photographer and an all-around nice guy. His blog focuses on food and travel with a big emphasis on his Greek heritage. He's here today to share with us a primer on using our cameras and to share how he achieves that moody look.

First off, I would like to thank Sylvie for allowing me to provide a guest post on her blog. I'm really excited at being able to share my thoughts on food photography.
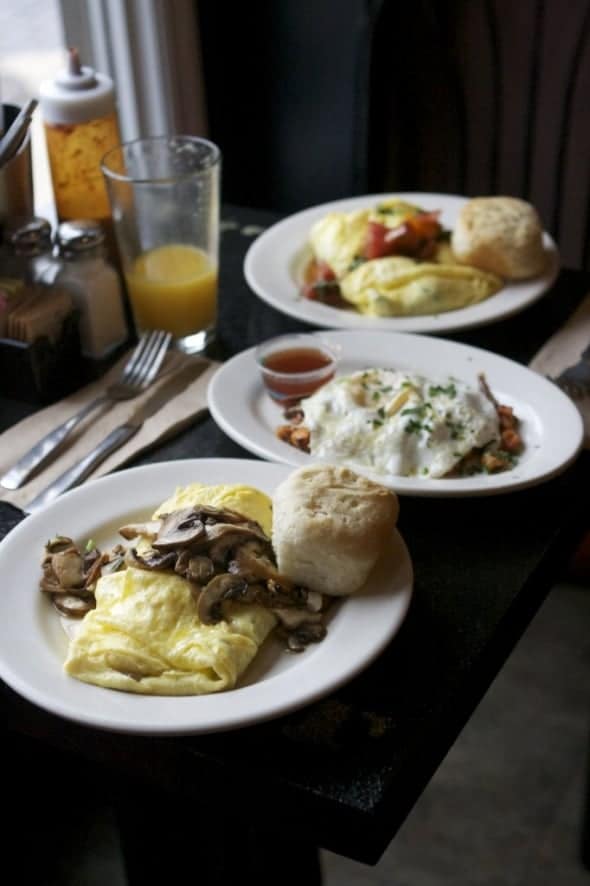
If you follow my blog, you'll know that I tend to favour darker, moody settings for my food photography. It's something that I'm particularly drawn to and being the person that I am, a little drama can give that necessary lift to an otherwise ordinary image. Don't get me wrong, I like "bright and white"-it's just that I prefer the dark and dramatic. Maybe it has something to do with my Greek heritage!..LOL!
Today I'm going to show you how I go about achieving those darker, moodier images.

Let me say upfront though, this method works for me. There are no "secrets". Just a lot of information developed through trial and error.
It's a workflow I'm comfortable with after many years of practice.
Like anything in life though, I'm always learning so if you have any other tips-pass them on!
I’ve covered a few of the “basics” in this tutorial as well. I’ve tried to be as natural as possible without sounding like a camera geek.
I'm also hoping most people are familiar with some of the technical aspects of photography, such as aperture, shutter speed and ISO. If you're only starting to grasp these things I can recommend a great book by Bryan Peterson called "Understanding Exposure". The book was produced a number of years ago however the photographic principles remain the same.
For today's example I'm going to be using some mini gluten free banana breads (made with coconut flour...my new favourite ingredient!) as my example.
This is what we're going to need:
- a DSLR camera or any of the newer compact style interchangeable lens cameras that allow you to shoot in a raw format connected to a tripod
- a light source
- some dark backdrops
- a white and black foamcore board
- a post processing program for editing pictures-I'm using Adobe's Lightroom

Cameras.
The sensors in modern day DSLR's are quite clever and have really developed over the years.
I shoot with a Nikon D700 (a "full frame" camera) and I'm constantly amazed at how this camera manages to pick up details in a scene. Even more so when that scene/setting is dark.
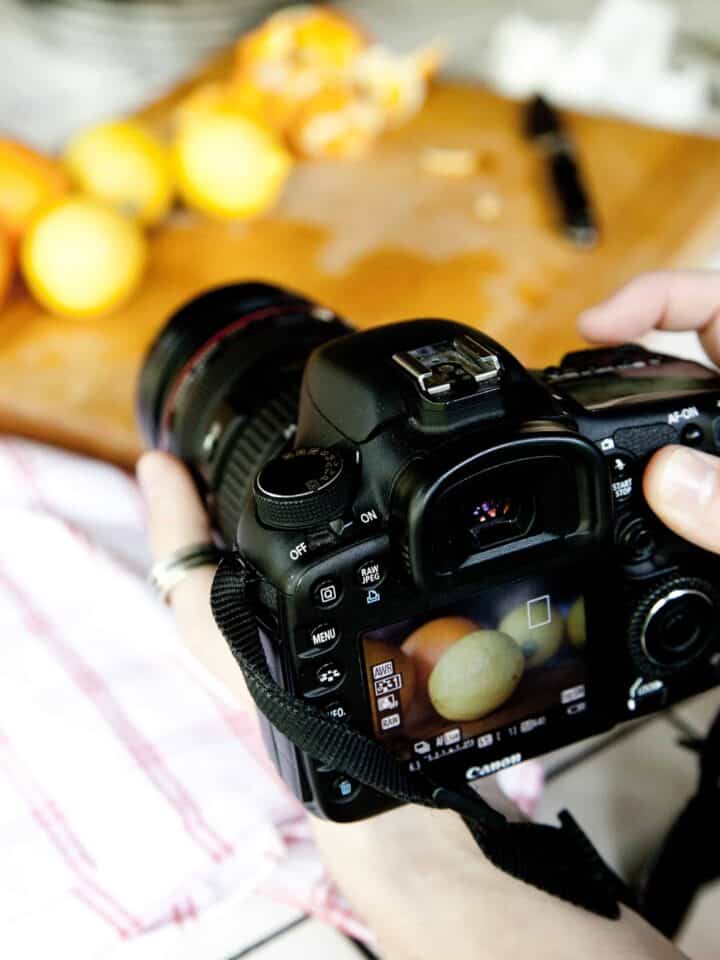
On most cameras you can view the metering through the viewfinder when you're actually taking the shot or you can view it on the rear LCD screen.
The light meter is (usually) on the bottom of the viewfinder screen and is identified by a zero in the centre and a plus + sign and a minus - sign on either side.
The built in light meter allows me to play around with the exposure. i.e. setting the lighting for the scene. (If you're not familiar with your camera's light meter, start learning how to use it).
Combine that with the aperture I have chosen and the shutter speed (and the ISO) I can set the lighting.
I do this by adjusting each of those elements and my light meter will react accordingly.
For e.g. if I choose an aperture to have dreamy shallow depth of field, I'm "opening up" the camera's eyes (so to speak) and allowing more light in (bear in mind that this will cause whatever I have focused on to be sharp and the remainder will be really out of focus). The light meter will then "react" and jump to either side of the zero. I can then adjust this in increments by adjusting the aperture or shutter speed and the camera will further react.
Here's an example of a Nikon viewfinder:

But it's not as simple as just dialing down the shutter speed and making a scene dark. It's a combination of things that all come together in the end. Hopefully by the end of the post you'll see how all these things come together to get that "perfect shot".
But there's one more thing...
It's never just one thing right?
The camera allows you to further choose the type of metering you want for a scene.
These metering modes can be found in your camera's settings.
Let’s check them out:
- Matrix or Evaluative Metering-this is like a "standard mode" where the camera decides for you
- Spot or Partial Metering-the camera will only measure a small part of the scene-usually the centre, but with most modern DSLR's you can choose the spot you prefer and base your reading off that. So if you have a really backlit subject you can measure the light on the subject and keep them showing in the scene. Or in our case, we can focus on the banana bread and keep it nice and lit while having our surroundings dark and moody.
- Centre Weighted Metering-In this mode the camera takes a reading from the centre part of the scene, including the surroundings and makes a reading off that. This is sort of a hybrid of the other two.
Which one to choose?
Again, there's no right or wrong answer.
I advise you to play around with these modes and see what you like and experiment on different subjects.
Personally, I like to have control of every single element so I choose spot metering.

PASM? What do they do?
You might have noticed that your camera has these letters either on the dial or in the settings.
They refer to the shooting modes (on top of everything else!). Don't be afraid...like anything if you understand what they do you'll be better for it.
Here's a quick rundown.
- P- Program mode-the camera behaves like a "point and shoot" and determines all the settings for you. Think of it as an advanced "Auto" mode. This can be useful sometimes but be wary you might not like the results!
- A-Aperture Priority-you choose the "f stop" or aperture setting on your camera and the camera will adjust the speed
- S-Shutter Priority-you set the speed of the and the camera will adjust the aperture for you.
- M-Manual Mode. You dial in aperture and shutter speed and basically tell the camera how you want your scene set.
I choose to shoot manual because it allows me to have TOTAL CONTROL. When you adjust your metering in this mode you determine how light or dark the scene will be. For these darker shots I highly recommend you practice in this mode.
Oh! a quick word on white balance...
White Balance refers to colour temperature.
Your eyes and mine see a scene as it should however our cameras don't always do this.
Have you ever noticed a blue-ish or orange cast on a picture you've taken? Well your camera read that scene in a particular way and compensated for it.
You can find your white balance settings in your camera’s settings.
The theory is that if it's a sunny day adjust your white balance in camera by choosing the "sun" option. If it's shady choose the "shade" option etc...
Because I shoot RAW and in manual mode I let the camera decide on the white balance for a scene by choosing Auto White Balance.
This is the only time I allow my camera to be the boss! The reason for this is because I can always change the white balance in my editing workflow back on the computer. The beauty of digital photography!
I'm also a bit of a "rule breaker" by choosing to enhance my scenes by warming them up or cooling them down-depending if I feel it's right for that picture.
Other times I set my white balance by using what's referred to as a "grey card".
Grey cards are inexpensive. You place the card in the scene you’re photographing and then take a reading off that card in your editing program.
This grey card helps “neutralise” the colour of the light in a scene.
Whilst it's not always perfect it provides tremendous help when needed.

Furthermore shoot RAW
I'm sure you've heard it a few times by now but shooting in the RAW mode on your camera allows you, as the photographer, to have total control.
If you shoot in JPG mode the camera makes all the decisions for you.
Furthermore, when you have a raw file you can adjust it to your heart's content in your preferred editing program and achieve the look you want.
Not only that, but shooting RAW allows you to "rescue" areas of a picture that may have been over or under exposed-to a point. This will of course depend on the type of camera you have as the newer DSLR's have advanced greatly with their super sensors.
My only words of advice here is not to be lazy! You can be holding the world's most expensive camera and using the most advanced editing program but if you can't grasp the basic lighting and metering principles then NOTHING WILL SAVE YOU!
Light Source
So, once we've understood how our camera meters we're going to need some light for our subject. Contrary to what you may think, even the darker images need light.
Your light source might be artificial or it can be natural. For today's tutorial I'm going to be using natural light.
Here's the set up in my little studio.


I just want to take another moment here to explain a little about our light.
When you shoot with natural lighting you're at the mercy of Mother Nature.
This can be both a good and bad thing.
Natural light behaves differently depending on the time of day and season.
Morning and late afternoon/dusk lighting in the summer time is the best. It's glowing and gorgeous and allows the food to really be showed off beautifully.
The reality is it's not always summer and frankly I don't like getting up too early to shoot. I can't focus that early in the morning...
Have you ever noticed how the light in the middle of a sunny, summer's day has a slight blue tinge to it? And that it changes to a more golden hue as the day progresses?
How about that dreaded winter light where it get all dark and gloomy at 4.30 pm?
I personally tend to favour shooting in the middle to later afternoon. My windows face south and I have learnt over trial and error that this is the best time for me. So I encourage you to pick a window and time of day and work on that.
My windows have these ugly blinds on them but sometimes they come in quite handy when I want to create a "shadowed" look to a picture. Again, I don't always do this but it does come in handy when needed.

Backdrops and Props
We're obviously going to need some darker backgrounds. I've painted some old pieces of wood in dark colours, like a charcoal grey and am also using a on old wooden board in this set up.
Foamcore...what for?
To assist with light manipulation I also use a selection of black and white foamcore boards. These are basically thick, sturdy pieces of cardboard that can be found in artists shop for a few dollars.
Depending on the light coming through the window, I use either of these. If the light is too strong, I place the black one to the side to take away some of that light. And when I need to give the food a little "lift" I reflect with the white one.
Again, I can't emphasise enough that this will depend on the type of image you're after.
Take some test shots with and without the different boards to see how it manipulates the lighting in the scene.
Combine that with our metering we're on our way to get that elusive, dark, mysterious image!
Here are some of the set ups. I've included the set up on the right and how the image looks straight out of the camera on the left.
All these photos were shot at an aperture of f2.5 an ISO of 200 with a 105 mm lens and white balance set to AUTO.
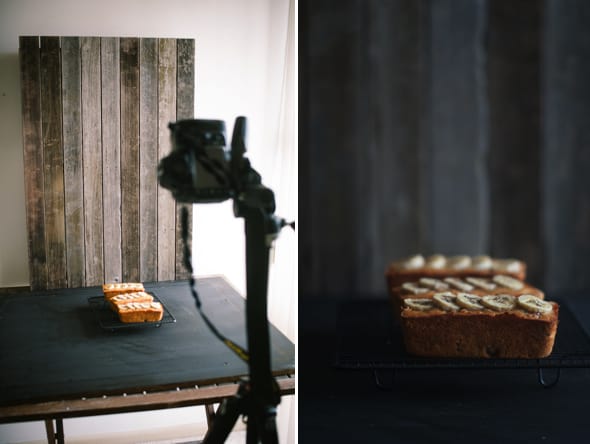
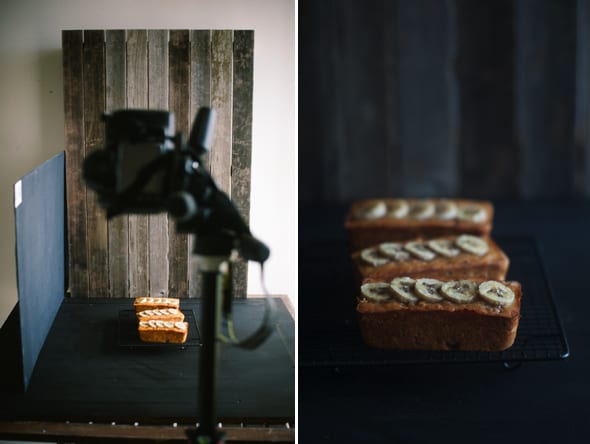
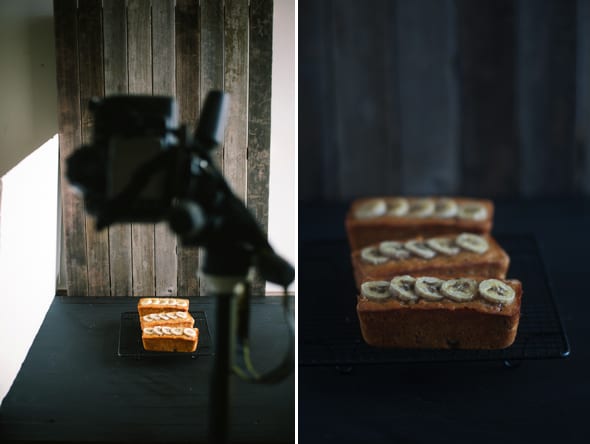
Take a moment to examine each of the set ups. As I explained before, by playing around with all the basic principles we can control how the image looks in the end.
Let’s take our image to an editing program.
Post processing and Editing-The Final Touch
There's probably like a million tutorials online about how you should edit your pictures and what program to use.
After many years of toggling back and forth I have settled on Adobe's Lightroom as my editing program.
The program has amazing features and apart from the editing functions it acts as a database for your pictures.
It has what is referred to as "non destructive" editing...so you can do whatever you want to your file knowing that the original will always be preserved safely. You can test out the program and all of its features free for a full 30 day trial.
I'm going to briefly say that I only ever use Photoshop for client work and only if it's needed.
I also want to add that no matter what people say about editing I believe it is an essential part of the digital photography workflow.
If you're the kind of person who always "gets it right" in the camera well, good on you I say!
I ALWAYS edit my pictures whether it's adjusting the exposure slightly or changing the white balance.
On top of that I want to show you the tools required in Lightroom to help us “enhance” our dark and dramatic food pictures.

In the above image you can see that with a program like Lightroom I have many tools available to me as a photographer.
Let's focus on the local adjustment brush.
With this tool I can target sections of a picture and do a number of things to those sections.
So in this banana bread example, I slightly added more exposure or light to the front of the bread using the brush to let it pop a little.
Along with that I also brushed in a little exposure to the background because I felt it was too dark. I basically rescued the shadows a little.
You'll also notice the vignetting settings. If you really want to add a little drama to an image you can enhance that drama by adding a little vignette to the outer areas of a picture. You can adjust the vignette to be as small, large or dark as you like.
Like anything I'm going to place this advice about editing with a word of warning. DON’T OVERDO IT! Like most things, less is more.
Sure, go ahead and adjust the basics of exposure, contrast etc.. but be cautious with that adjustment brush and the vignetting. If you start adding too much light here and there and vignettes your image will look unnatural and highly manipulated.
Think of it like make up.
Adding a little here and there will enhance your best features.
Start overdoing it and you end up looking like a clown.
And finally I present to you the finished image!

So here's a quick summary because I've feel like I've rambled a fair bit today!
- Learn to use your camera in manual mode and shoot RAW. You will have total control of the finished product.
- Play around with your camera's light meter and see what each adjustment does to your pictures.
- Understand how lighting works during the different seasons and times of day.
- Play around with black and white foam core boards on your food. See how each one affects the lighting.
- And finally learn to edit your pictures and enhance them naturally. Too much enhancement is like applying too much make up.
 Peter Georgakopoulos is a food and travel photographer and blogger with a passion for food and eating. Along with his camera he aims to capture the beauty and simplicity of the food we eat and the big wide world around us. You can find Peter on Twitter and Facebook.
Be sure to read the full Summer Food Photography Series:
- Finding Props for Food Photography with Naomi Robinson | Summer Food Photography Series Part One
- Styling for Food Photography with Chantelle Grady | Summer Food Photography Series Part Two
- Learning Your Camera and How to Shoot Moody Images with Peter Georgakopoulos | Summer Food Photography Series Part Three
- Rules and Tips on Restaurant Photography with Brian Samuels | Summer Food Photography Series Part Four
- Food Videography with Russell van Kraayenburg | Summer Food Photography Series Part Five
- Q&A with Food Photographer Jim Scherer | Summer Food Photography Series Part Six

Sylvie Shirazi is the recipe developer and food photographer behind Gourmande in the Kitchen. For the last 10 years she's been making eating more healthfully easy and accessible with gluten-free, grain-free, paleo and vegan recipes that are free from processed ingredients.
Judith says
His pictures are just amazing. Love his work. Thanks a lot for this blog-post. I have to try this for my own still tiny food-blog.
Fa's Kitchen says
I like Peter's work a lot.. Thanks for sharing this Sylvie.. A fabulous post written in such an easy way that even the amateurs like me can understanf
Ellie@Fit for the soul says
Wowww this is just wow....one of the best tutorials I've come across so far!!! Thank you so much for the thorough and informative post! I do have a question though~if one were to pursue food photography and use those skills for restaurants, books, magazines, etc., then is there one style that most of them prefer? Light+white vs. dark+moody food photos? Or does it depend on the company most of the time? I know that for something like Kinfolk they would likely go with the moody quality~but I've always been curious about restaurants and other food magazines.
Caroline says
I am so excited…I'm jumping up and down! I bought my first DSLR camera (Nikon) over 6 months ago and have struggled to learn it! I've use a lot of the auto settings just to get by. Well, I followed Peter's tutorial today because I'm a huge fan of his work…I feel like I finally understand my camera!!!! I took my best shots ever today and I'm thrilled! I'm about to put up a post scheduled for tomorrow morning, but I'm so happy with the photo, I want to put it up right now! THANK YOU SOOOOOO MUCH! 😀